Kawi2strokes.com Forum

Enthusiasts from around the world dedicated to the preservation and ritual flogging of the infamous Kawasaki 2-stroke Triples
It is currently Fri May 16, 2025 11:56 am

All times are UTC - 5 hours


Post new topic Reply to topic  [ 101 posts ]  Go to page Previous  1, 2, 3, 4, 5, 6 ... 11  Next
Author Message
PostPosted: Sun Nov 22, 2015 9:50 pm 

Joined: Wed Jun 22, 2011 11:43 am
Posts: 311
Location: CT and Sometimes SC
This bike comes with a trim piece that has a color matching piece of tape down the middle. This piece trims out the bottom of seat and tail piece.

Image


Heat gun and some Acetone made quick work of the tape. The pieces then got polished and my hope is Painter can repaint the mid portion of the trim. To be honest after they polished up they looked like they could go back on like that, similar to a Kaw Triple seat trim.

Image

Everything is now ready to head to paint right after the holiday. The tank door and side panels are going to be the same color as the tank and tail piece. This is one deviation from stock, I just think it looks better. The Black side panels to me just leave a big blank space in the middle of the bike, it will look better with color

Image


Top
 Profile  
 
PostPosted: Sun Nov 22, 2015 9:53 pm 

Joined: Wed Jun 22, 2011 11:43 am
Posts: 311
Location: CT and Sometimes SC
The hubs got painted in VHT Universal Aluminum. They are going to a get a gloss clear on them that I think will look good and the VHT will match the engine paint. I did a KTM 495 the same way and it came out very nice.

Image


Top
 Profile  
 
PostPosted: Mon Nov 23, 2015 5:53 pm 
Moderator
User avatar

Joined: Thu Jun 09, 2011 6:16 am
Posts: 2147
Location: North Alabama
Nice detail on your resto ktmguy......thanks...enjoying watching the process.

_________________
Busy doing more riding than wrenching.......


Top
 Profile  
 
PostPosted: Mon Nov 23, 2015 8:49 pm 

Joined: Wed Jun 22, 2011 11:43 am
Posts: 311
Location: CT and Sometimes SC
Thanks Rick, hopefully it will be ready for Deals Gap in May.

Got the powder coat back today, 19 pieces total. Just had to put the reproduction VIN Tag on, it's a nice little detail.

Image

Image


Top
 Profile  
 
PostPosted: Mon Dec 07, 2015 10:26 am 

Joined: Wed Jun 22, 2011 11:43 am
Posts: 311
Location: CT and Sometimes SC
After another week away it was back at it this weekend. Most everything revolved around getting ready for a rolling chassis. Forks were rebuilt with new tubes, seals, caps, dust caps, and springs. Wheels got clear coated over the VHT Universal Aluminum with new bearings and seals, Honda spokes, DID Rims, new tubes and fresh Metzlers. If I can sneak out of work a little this week, :D :D a few other items may get prepped and a rolling chassis could be on the stand after next weekend. That would great to have that, and then some, done by Christmas. The Holidays really slow things down with all the parties and such, and I ain't exactly one to shy away from the holiday spirit and Egg Nog.


Getting set to build a wheel.

Image

Steve McQueen watches over the truing process.

Image

Wheels and forks ready to go.

Image


Manchester Honda got in a boat load of KTM stuff for Christmas so the Wife and I stopped by on Saturday to do some Christmas shopping. I got this apron, (pretty good deal I thought for $15 and change) and now don't know how I ever worked without one. If I had this thing years ago I might not have drawers and drawers filled with grease stained dirty sweat shirts. I like the pockets too.


Image


Top
 Profile  
 
PostPosted: Mon Dec 14, 2015 6:13 pm 

Joined: Wed Jun 22, 2011 11:43 am
Posts: 311
Location: CT and Sometimes SC
Had to do a Saturday Christmas tree/lunch with the Wife Saturday and then it was our company party that night. More parties next weekend too. Does this season ever end? Do what I must but the build will continue, needless to say Sunday was a somewhat slow build day, but, we are almost to a rolling chassis. Still need to rebuild the rear brake and it should be all set. I like the look of the ground and drilled brake rotors.

Image

In the, "This Ain't No Sandcast Resto" department comes this:

I never was one for cheap, knock off repro shocks. That's why I buy these decals.

Image


Top
 Profile  
 
PostPosted: Tue Dec 15, 2015 8:31 pm 

Joined: Wed Jun 22, 2011 11:43 am
Posts: 311
Location: CT and Sometimes SC
Had a few hours away from work today and got some good ground on this resto.

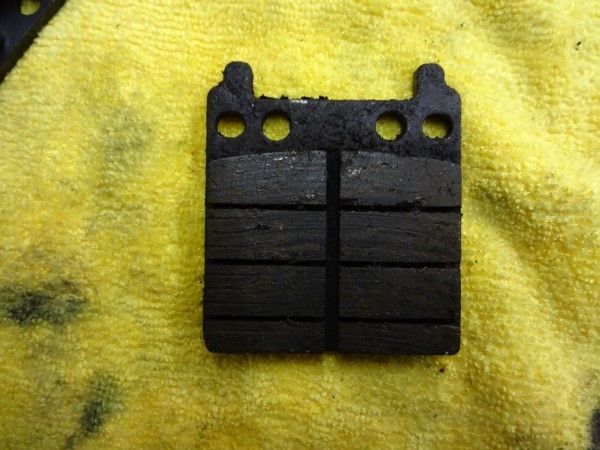
The rear brake needed to be rebuilt to get to a rolling chassis. The caliper got painted the other day and was now ready to assemble. Here is a pic of one of the pads that came out of the rear. A PO had cut slots parallel with the ground and coated the back of the pads with some kind of goop, this brake was a squeaker.

Image

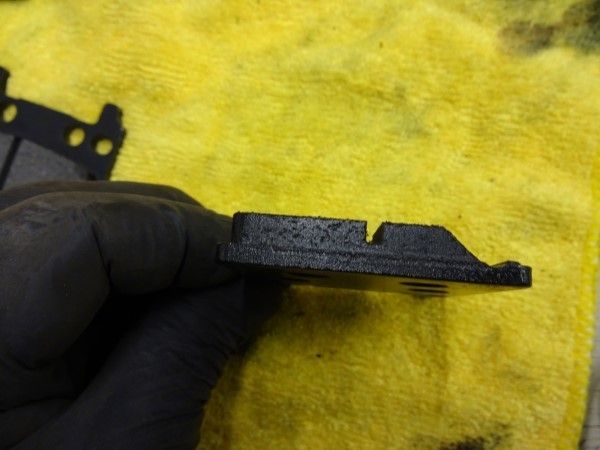
My fix, one larger line parallel to the ground and a 45 degree cut into the pad where it first contacts the disc, that is the rear of the pad, not the front. The pad also gets the obligatory anti squeak stuff but this is what does the job IMO.

Image


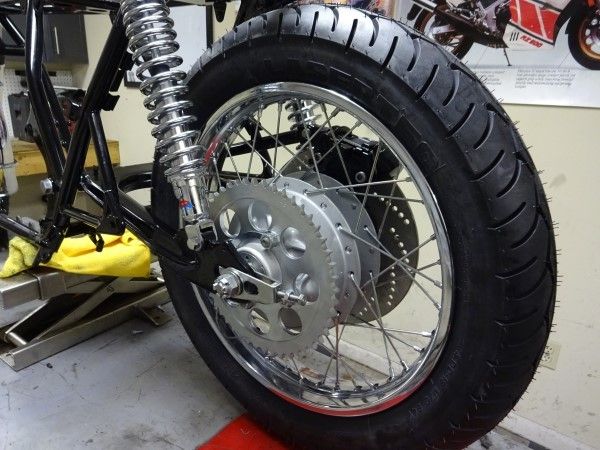
And that brings us to a rolling chassis. This is always a milestone as now the bike can be worked on steady on the lift and actually starts to look like something.


Image


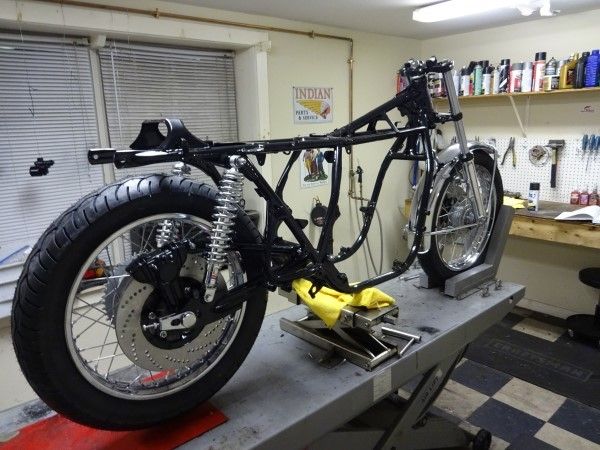
Some rear wheel pics, it has new bearings, seals, rims, spokes, cush drive rubbers, sprocket, and sprocket lock washers. Sprocket nuts, among many other fasteners get a fresh Zinc replate.


Image

I like the look of the VHT Universal Aluminum and a Glossy Clear over it. It will look really good once the motor of the same color gets installed. The motor will be VHT only and no glossy clear.


Image


Top
 Profile  
 
PostPosted: Fri Dec 18, 2015 12:51 pm 

Joined: Wed Jun 22, 2011 11:43 am
Posts: 311
Location: CT and Sometimes SC
Got the brakes pretty far with the rear done and the front to the triple clamps. It will get finished once the bars are on. Still waiting for a new cap for the rear and some bleeder screws to come in. Interesting that I could not find a rear hose anywhere but had a Kawasaki Front Hose in my stash, from what model I do not know, but it fit.

Image

Image

Got the stands on. Everything is Zinc re-plated and the holder is in the same Glossy Aluminum base theme. Some under arm shots.

Image

Image

Luckily I have been able to put a few hours into this build the past few days. Tomorrow I hope to get some prep work and plating done on chassis parts, then Saturday it will be time to start tearing down the motor, gonna need some help getting this girl up to the bench, ain't no RD350.


Top
 Profile  
 
PostPosted: Sun Dec 20, 2015 8:10 pm 

Joined: Wed Jun 22, 2011 11:43 am
Posts: 311
Location: CT and Sometimes SC
Disassembled the motor today and now the cases shown here will get cleaned and painted tomorrow depending on the outcome of yet another Christmas party tonight. I am hoping to have the head and cylinder bead blasted and to the machine shop this week too. If I can get the cases cleaned, painted, and cured this week the motor reassembly may be able to start next weekend. This motor looked incredibly fresh. I have no doubt that it would have run fine with just some TLC. But, it is going to get a little more than that. It appears that the bike must have just had a tune up before it went into it's 20+ year hibernation. The plugs and points were like new.


Image


My buddy Tim came across these egg cartons and gave them to me. They are great for holding parts. My Father In Law's 68 Corvette, a future project, is organizing these parts under that Yellow cover


Image

Tim gave me enough cartons to start a farm.


Image


Other parts tagged and bagged, lots of pics taken too.


Image


If you are going to do anything to one of these bikes Hondaman's book is a MUST HAVE. It is far and away the best damn manual I have ever used, period.

Image

Use this manual or a Haynes if you want to, "Reassemble in the reverse order of disassembly" otherwise get Hondaman's book and learn all kinds of tips and tricks.


Image


Top
 Profile  
 
PostPosted: Sun Dec 20, 2015 8:13 pm 

Joined: Wed Jun 22, 2011 11:43 am
Posts: 311
Location: CT and Sometimes SC
Clean and prep, clean and prep. These bikes come apart pretty quick and don't take that long to assemble. It's the stuff in between that takes the time. Ya also don't get a lot done when you start at 11:00 and keep forgetting where you left your coffee. Oh well, only one more Christmas party to go. Got all the case and oil pan bolts replated. The lower case got bead blasted and thoroughly cleaned, it is now ready for tape and paint. Plan is to get the cases painted and cured before the holiday, we'll see.


Image


Image


Top
 Profile  
 
Display posts from previous:  Sort by  
Post new topic Reply to topic  [ 101 posts ]  Go to page Previous  1, 2, 3, 4, 5, 6 ... 11  Next

All times are UTC - 5 hours


Who is online

Users browsing this forum: No registered users


You cannot post new topics in this forum
You cannot reply to topics in this forum
You cannot edit your posts in this forum
You cannot delete your posts in this forum
You cannot post attachments in this forum

Jump to:  
Powered by phpBB® Forum Software © phpBB Group