Kawi2strokes.com Forum

Enthusiasts from around the world dedicated to the preservation and ritual flogging of the infamous Kawasaki 2-stroke Triples
It is currently Fri May 16, 2025 11:59 am

All times are UTC - 5 hours


Post new topic Reply to topic  [ 101 posts ]  Go to page Previous  1, 2, 3, 4, 5 ... 11  Next
Author Message
PostPosted: Sun Nov 08, 2015 10:11 pm 

Joined: Thu Jun 09, 2011 11:25 am
Posts: 3156
I just remembered what the main issue is with the top ends on those, they'd lose the hard chrome plating off the cam follower/rocker pad that rides against the cam lobes. We found that low viscosity oils, and especially synthetics don't allow the correct lube on those parts. Failure is almost ensured with any synthetic, and natural oils with 10W-30, 10W-40 oils. 20W-50 natural, or straight natural 30W/40W, good to go.

Another thing to look for is the oil orifii under the rocker shaft stands. When you get the rocker stands off the head, under them, you should find 2 round, very small inserts with screens on their bottoms, and small holes, one for each stand. They should simply lift out of their holes. the screens, if yours has them, plug up with debris, and the holes plug up too. These oiling parts lube the cam journals, NOT the lobes and rocker pads.

Just more stuff I remember about those engines.


Top
 Profile  
 
PostPosted: Mon Nov 16, 2015 11:00 am 

Joined: Wed Jun 22, 2011 11:43 am
Posts: 311
Location: CT and Sometimes SC
Back at it again after a short trip to South Carolina. After using up my entire expletive vocabulary I ended up with this, the motor out of the frame. This was my first time doing this on a SOHC 750 never mind alone, and it took a bit of learning but I got it out by having the frame on it's side and using wood blocks to keep the motor and frame aligned. You get spoiled working on 2 strokes, they pop in and out of frames so easy you don't even think about it. One thing is for certain, I will be calling in help when that motor goes back in.

Image


A lot of stuff is now ready to go. Chrome will be heading off to PA.

Image

Powdercoat heads out today too. This is usually a quick turn around so I am hoping to have it back by next weekend.
Image


Top
 Profile  
 
PostPosted: Mon Nov 16, 2015 11:01 am 

Joined: Wed Jun 22, 2011 11:43 am
Posts: 311
Location: CT and Sometimes SC
I have already taken a sheeter on this bike before it even runs. The bike sat in the trailer for a couple of months before we needed the trailer. When I went and took it out I had a brain fart and forgot the front brake was Doo Doo Ben Gada.
Once on the ramp the bike got away from me and I threw it to the opposite side of the ground I was heading to. It looks like the only casualty was the Right peg bracket. I bought a used one off Ebay and the difference is obvious, in both pics the one on the Right is the bent peg.

Image

Image


Top
 Profile  
 
PostPosted: Mon Nov 16, 2015 11:04 am 

Joined: Wed Jun 22, 2011 11:43 am
Posts: 311
Location: CT and Sometimes SC
Lots of stuff Bagged & Tagged.

Image

New stuff waiting for assembly.

Image

Image


Top
 Profile  
 
PostPosted: Mon Nov 16, 2015 11:05 am 

Joined: Wed Jun 22, 2011 11:43 am
Posts: 311
Location: CT and Sometimes SC
I was surprised to see a new tapered steering head bearing kit installed on this bike. I may be wrong but assume the OEM were fall on the floor type. Looks like I may take the set I bought and put it on the New Spare Parts Shelf that my Wife knows nothing of. See, that's the difference between the sexes. Women have no problem returning anything that isn't even the right color. Guys, on the other hand, will return a part that is definitely wrong but think twice about something they, "Could Need Someday"

Image

With Powdercoat and Chrome ready to go Monday paint still needs to get out as it is a long lead item. This tank has had a very nice, " JB Weld" patch job. That will need to be scrubbed off and repaired with the tank getting a Caswell Liner before it heads off to the Painter.

Image


Top
 Profile  
 
PostPosted: Mon Nov 16, 2015 1:21 pm 

Joined: Wed Jun 22, 2011 11:43 am
Posts: 311
Location: CT and Sometimes SC
Finished up disassembly including the wheels and forks. This one tool has sped up a restoration for me more than anything else. I can't believe I use to take wheels apart and save the old spokes, never mind what a PITA some of those old tires are to take off. I save just a few spokes and label them as a reference. The rest, along with the wheels and tires are already in the dumpster.

Image

Here is another great tool. After having a small Oxy Acetylene set up in my truck for 30 years, I always had access to one. Now that I am in the office that is not a job benefit anymore. In the shop I have been using a $20 Home Depot Mapp Gas torch and though it works good, it can't even come close to the Oxy Acetylene. Old bearings and seals pop out super quick with is baby, it also has many more uses, takes up little space, and is very mobile.

Image


Last edited by ktmguy on Mon Nov 16, 2015 1:25 pm, edited 1 time in total.

Top
 Profile  
 
PostPosted: Mon Nov 16, 2015 1:24 pm 

Joined: Wed Jun 22, 2011 11:43 am
Posts: 311
Location: CT and Sometimes SC
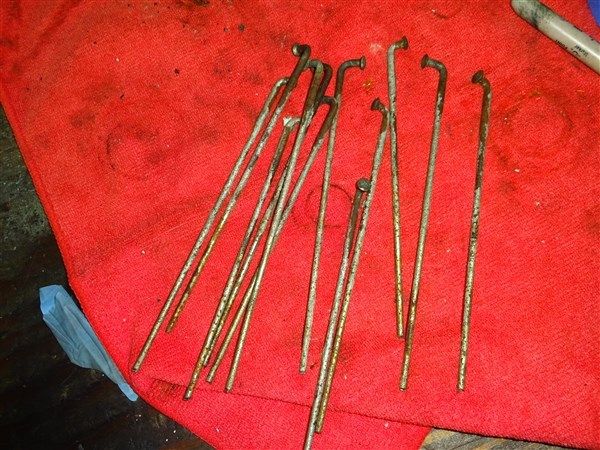
One of the things I like about tearing down an old bike is learning about it's history, and that usually means what type of hack owned or was working on it in the past. Here is how one PO thought you could clean up old spokes by applying Silver paint on them with a brush.

Image

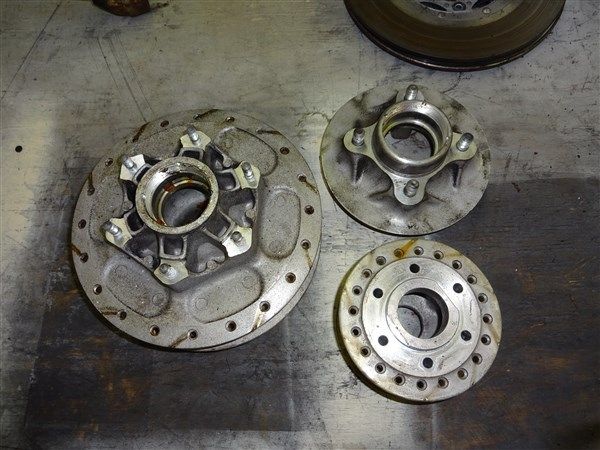
Hubs are now ready to be cleaned up, have new bearings and seals installed, and be laced to new rims.
Image

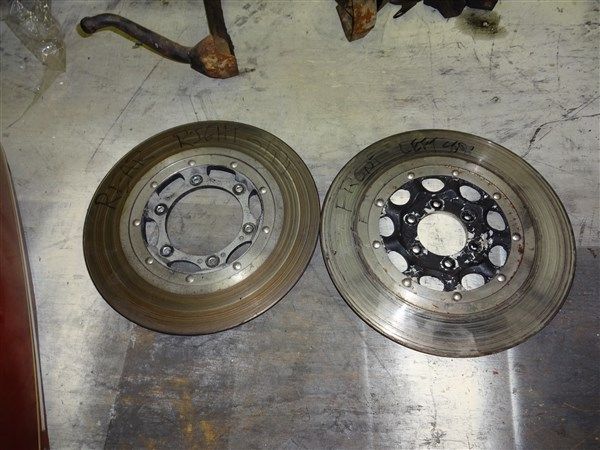
Disks are being shipped out for grinding and drilling. This is one area that will not have the stock look. I like the way the drilled disks look on The Norton and CB400F restorations and this bike will get that too.

Image


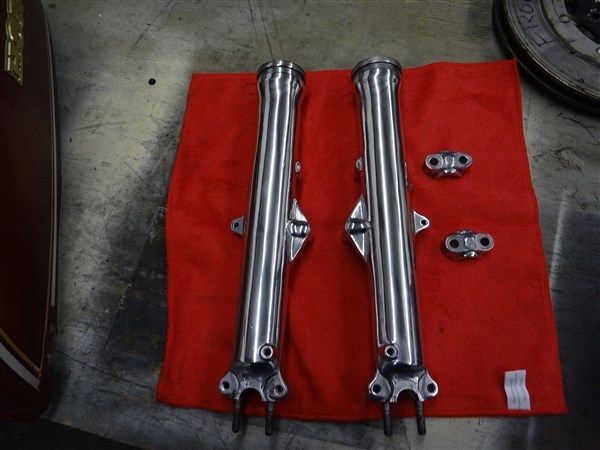
Had just enough time to finish the fork lowers. I use to go through a whole process of sanding down to 1000 wet and then polish. Now, they get an ultra fine glass bead, Tripoli polish, and then Jewelers Rouge. The bead takes a little time as it is not very aggressive and leaves a nice smooth finish, but it is still much quicker and easier than all that sanding.

This is a good point to be in a restoration. The project turns the corner from tear down to prep and assembly. In the coming weeks, God willing and the creek don't rise, it should start turning back into a motorcycle.

Image


Top
 Profile  
 
PostPosted: Mon Nov 16, 2015 2:16 pm 

Joined: Thu Jun 09, 2011 11:25 am
Posts: 3156
Ah...yes, engine removal, what an educational tool that is, learning a LOT of four letter words all at once. It gets even better the reverse, putting the engine back in the frame. Clue, leave the oil pan and pickup OFF the engine, but, that doesn't help much, a little, but, not really much.

With those frames, it is totally impossible to pull the top end off with engine still in the frame. Some creative folks used to hack saw the two lateral tubes off the frame, so they could get to the top ends easier, and there was even an aftermarket kit that would allow removing the frame rails, then reinstalling them. One cannot even drop the engine in the frame enough to get the cover, and other parts of the engine off.

MANY have removed the engine as you have, some, only from the empty frame, some few more with the front and rear ends still attached. The '77/'78 frames had the two tubes in question rerouted to allow the cam cover off the engine without removing the tubes.

Tapered head bearings are usually the normal for those bikes, the stock Honda loose ball bearing setups have very soft cups and races, dent very easily.

Makes you wonder where the designers that did this mess came from. Well, Honda has its own in house engineering school/university, and preference is given to THOSE students, over outside applicants. Learn via the Honda way, work via the Honda way, no matter how much lack of common sense is involved/suppressed. Auto and motorcycle students are not allowed to interact at the schools, the cars are very easy to work on, the bikes, only one four letter word explains it all.....P A I N .


Top
 Profile  
 
PostPosted: Mon Nov 16, 2015 7:22 pm 

Joined: Wed Jun 22, 2011 11:43 am
Posts: 311
Location: CT and Sometimes SC
There is a guy out there that has a video of making up a rig with a 2 by 4 and tie downs to bring the motor back into a rolling chassis using 2 people. My plan this early on is to do the same thing except with 3 of us. Even with a heavily taped up frame I don't want to ruin frame powdercoat or new engine paint.


Top
 Profile  
 
PostPosted: Sun Nov 22, 2015 9:43 pm 

Joined: Wed Jun 22, 2011 11:43 am
Posts: 311
Location: CT and Sometimes SC
The main project this weekend was getting the paint ready to go out, and that meant dealing with the tank. This is by far the worst tank I have restored, it leaked like a sieve and had been JB Welded. Thankfully it had never seen a liner so that was one less thing to deal with. First step was to clean the inside of the tank. First was an Acetone rinse with a box of drywall screws, then a water rinse, next a 50/50 Muriatic Acid and Water rinse, then about 7-10 water rinses. The screws are then removed. I have learned the easiest way to get all the screws out is to use water and wash them out. If you just keep shaking the tank and try and get all the screws to fall out dry it can be frustrating. Filling the tank with water and shaking the screws out with the water is much easier and quicker. Once the tank was clean it was time to remove the JB Weld and replace it with solder.

Image

Here is the solder being blended into the tank, the painter should be able to take it from here.

Image


The bottom was even worse.


Image

The bottom didn't need much blending just enough to not interfere with the frame.


Image


After everything was soldered up and held water it was 4 hours on the hair dryer and then a final Acetone rinse in case any flux got into the tank.

Image

The tank then got 2 coats of The Caswell Liner Kit. The tank will now sit for about ten days. The petcock stub will be drilled out and the petcock installed to make sure it is free and clean to install after the tank comes back from paint.


Top
 Profile  
 
Display posts from previous:  Sort by  
Post new topic Reply to topic  [ 101 posts ]  Go to page Previous  1, 2, 3, 4, 5 ... 11  Next

All times are UTC - 5 hours


Who is online

Users browsing this forum: No registered users


You cannot post new topics in this forum
You cannot reply to topics in this forum
You cannot edit your posts in this forum
You cannot delete your posts in this forum
You cannot post attachments in this forum

Jump to:  
Powered by phpBB® Forum Software © phpBB Group