Kawi2strokes.com Forum

Enthusiasts from around the world dedicated to the preservation and ritual flogging of the infamous Kawasaki 2-stroke Triples
It is currently Fri May 16, 2025 9:59 am

All times are UTC - 5 hours


Post new topic Reply to topic  [ 101 posts ]  Go to page Previous  1, 2, 3, 4, 5, 6, 7, 8 ... 11  Next
Author Message
PostPosted: Sat Jan 09, 2016 9:03 pm 

Joined: Wed Jun 22, 2011 11:43 am
Posts: 311
Location: CT and Sometimes SC
Got the cases just about ready to assemble tomorrow, also got some general maintenance done around the shop, sweeping, cleaning, stuff like that. The top end isn't ready yet so I will probably move back to the chassis barring some unforeseen problem with the cases.

Image

This K/Start Return Spring proved worthy of it's name. Many are a biatch but these have a special place in Hell. Both Hondaman's book and the generic manual give no special tip on how to reinstall this assembly. I finally got it by using a screwdriver to pull the spring up while getting the pawl below it's stop and then using my third arm to pull the spring to it's locator. I really think that kicking the bench twice, and yelling at the top of my lungs, "Get in There You Mutha....." is what eventually pulled it together. This is one of those jobs that definitely has a, " Oh My God it Just Popped in, Nobody Move" moment.


Image


Top
 Profile  
 
PostPosted: Sat Jan 09, 2016 9:50 pm 
User avatar

Joined: Thu Jun 09, 2011 7:03 am
Posts: 4612
Location: Milang, South Australia
I am enjoying the build, but it does make me appreciate the "shake and bake" style of Kawasaki engine building...!! :lol:

_________________
"One day, your life will flash before your eyes. Make sure it's worth watching." : anon.


Top
 Profile  
 
PostPosted: Mon Jan 11, 2016 10:49 am 

Joined: Wed Jun 22, 2011 11:43 am
Posts: 311
Location: CT and Sometimes SC
Got the cases together today, they are sealed with Hondabond, twice. As good luck would have it, after the cases were sealed and set together one of these little Bastids fell off one of the 8mm lower crank bolts and fell through the open hole where the oil pan is, WTF. Though the cases had not been bolted together the Hondabond had started to set and the whole shebang had to come apart and get cleaned up again.

Image

A pic of the bottom, the oil pan is on in this shot, I will cover that opening with a rag next time. The bike gets a new Neutral Switch and all the bolts have been replated. I know you will never see these bolts on the bottom but it makes for a nice clean reassembly.


Image

Left side is complete. Being a 2 stroke guy you would never see a Smoker sitting on the bench with covers on and no top end, that's what a frame is for. Still thinking about putting it back in the frame. Luckily I know a few guys who will do almost anything for beer to give me a hand.


Image


I've had this kit for quite awhile now and it is great for bikes like this that have lots of O Rings that don't come with a gasket set.

And, by the way, who is the guy that figures what goes into a gasket set and what doesn't?
Ya know, if somebody wanted to make a few bucks they would find out what all the O Rings and seals are that don't come with the so called, "Kits" and sell them, I know I would buy them.


Image


Top
 Profile  
 
PostPosted: Mon Jan 18, 2016 12:56 pm 

Joined: Wed Jun 22, 2011 11:43 am
Posts: 311
Location: CT and Sometimes SC
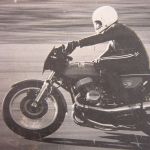
While waiting for top end parts for the motor the chassis got some attention. The front end is where we went today. This bike has had the headlight assembly off before, can't fool me I went to College for 2 weeks.

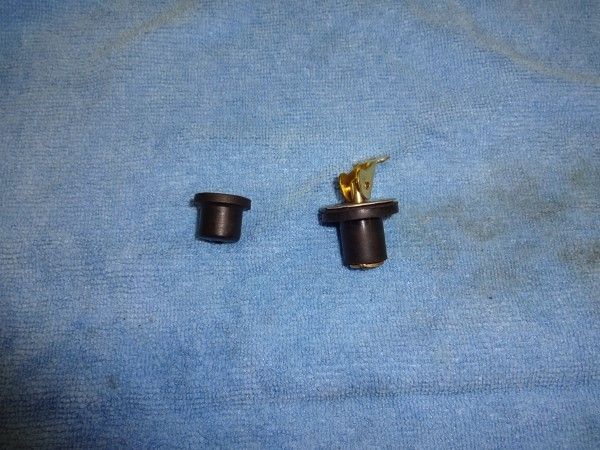
This is a pic of the headlight bracket and you can see at the bottom 2 different types of rubber mounts. These mounts just slide into holes in the lower triple clamp. My best bet is the OEM one is the one with a flange and the one that looks like a crutch bottom came from the arrow tip bought at some Arizona Tourist Trap, kid's love 'em but they ain't that good for headlights . The assembly was loose and needed some tightening up.

Image


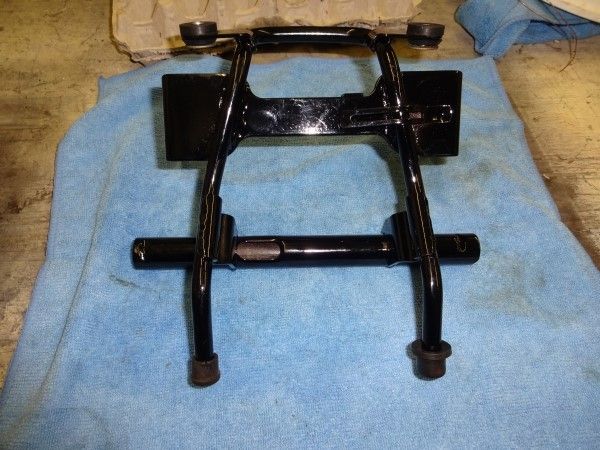
I found this expanding plug at the hardware store in the "Nut, Bolt, Washer, and Other Stuff" aisle. Took out the guts, burned it through with a hot 5/16 drill bit and it worked like a charm. The headlight frame is just as solid as a rubber mounted frame can be.


Image


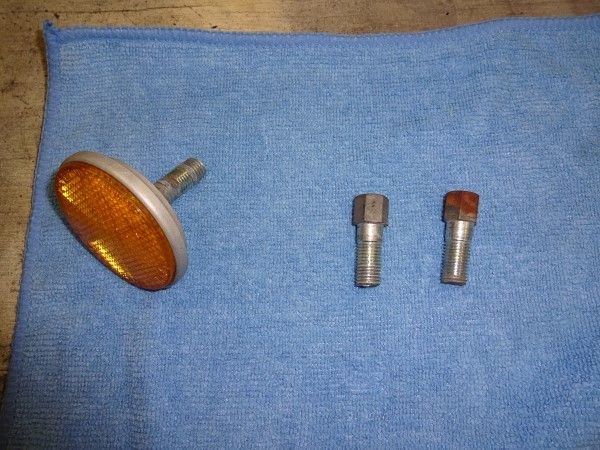
This is why you don't throw good stuff away. When I finish a bike the remains get archived upstairs. One of the headlight reflector mounts on this bike had the reflector screw broken off inside. I could have drilled it out and tapped it but I went through the stuff in the 400F Archive, (Just a Cardboard Box Marked 400F Really but Archived Sounds Professional) and found one.

Image

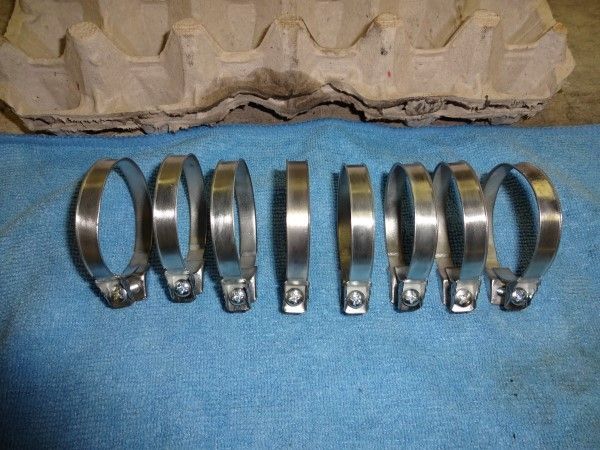
Lots of stuff got plated today too. These are the carb to engine side clamps. I have carb to air box clamps from another resto that will be being used, big cost savings there. The other pic is of all the engine mount bolts. This should be all the plating that needs to be done, yeah, right. Whenever I think the plating is done some oddball thing-a-ma-bob comes up and the whole set up has to come out again. When I was out in the field doing HVAC Work we had a saying, "Never put the torch away" If you put the torch away, sure as hec you will have a leak. I do the same thing with the plating, the set up stays assembled for the whole resto, just needs to be plugged in.


Image


Image


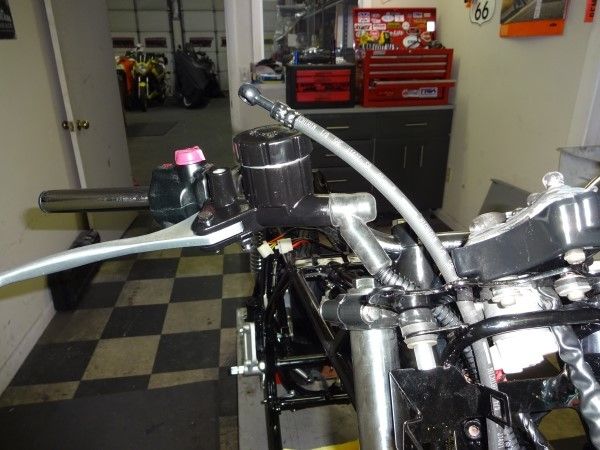
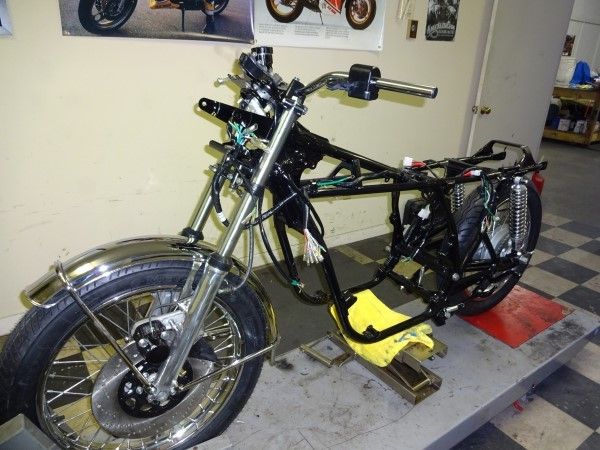
One of the non stock changes made to this bike was the bars. Back in the glory days of these bikes one of the most popular mods were Low Bars. I think they will look, and work well. These bars have a few hours in them as they have all the wiring running through them. The bars I purchased were not pre machined. I ain't no machinist but got a pretty good eye and a decent Black Magic Marker. That, with a Dremel tool and a Step Drill got it done.


Image


The low bars are going to require a few mods. I took a chance and ordered a 400F upper hose from David Silver that fit perfect. Here is a pic of the reproduction master and the DSS upper hose compared to the stock Honda hose. Oh, and these reproduction Masters are great. I have used them on both Kawasaki and Honda restos. For the money it is so much easier and cleaner than a rebuild kit with paint. I already have some ideas for the cables when the time comes for these bars, we'll make 'em work.

Image


Top
 Profile  
 
PostPosted: Mon Jan 18, 2016 1:03 pm 

Joined: Wed Jun 22, 2011 11:43 am
Posts: 311
Location: CT and Sometimes SC
Time for one step forward and two steps back. Or, as I like to call it, I am an idiot.

The cases sat assembled since last weekend. Like a proud parent I would show them to friends who stopped by until one made a comment, " Is that seal suppose to stick out like that?" The Countershaft seal was sticking out on about the lower third portion outside the flush case about 1/8". I am sure that measurement has a metric counterpart but I was to dumbfounded and pizzed to figure it out. Well, I thought, "Maybe just tap it back in" and that's what I did and went onto other stuff. Went to work on the carbs for awhile and this uneasy feeling kept with me. It was like the feeling you have a day or two later when you're in your early twenties and forget to use protection. Here is the seal after I tapped it back in.

Image

Here is a pic after removed and I think you can see how it is bent slightly. This seal has almost no meat to grab on the countershaft as it is and I am glad I retrieved it.

Image


So now we are back to this. I will order a new seal and some gaskets that headed South. Hopefully this can come together for next weekend.

Image


Anyway, got the carbs all apart and they will be heading out to get Vapor Blasted. Never did this before but am going to try the look on this bike. A before pic,

Image

Got to work on the meters, before.

Image


Image

I use to use this paint can tool for opening meters and started doing the same thing with the tach on this bike. And, then it hit me, 750 Faces gives you NEW rings. You don't have to re use the old ones. Well, once that thought was processed these rings were like spokes with the wire cutter. Clipped them right off.


Image

And the after pics. The meter cases are still drying so they are not completely assembled, but this 750Faces kit is Da Bomb. They give you the whole plate, no wet sanding your plate, chuck that biatch. They give you new glass too which makes a big difference. Top notch product IMO compared to just getting some decals. I use Fluorescent Spray Paint sprayed into a cup and an Artiste's Brush for the needle tip. I use to have all these hobby paints, but they never last. Spray paint seems to last forever, though you may have more than you will ever use.

Image


Top
 Profile  
 
PostPosted: Mon Jan 18, 2016 5:38 pm 

Joined: Thu Jun 09, 2011 11:25 am
Posts: 3156
Mmm, I suspect, from the picture, you used some sort of bond on the seal OD to help seal it into the cases. Not even Three-Bond 1194 will help keep the seal in place if it is on the seal race to cases facings. Seals that are basically crimped into place by the case spilt, use a different compression factor to hold the seal in place.

I get hammered by a top tuner here every time I say that the seals that are crushed into place should only be installed by splitting the cases, and dry, but, you have experienced exactly what I have seen for eons and decades. Those seals are not meant to be installed from the side, after the cases are bolted together, no matter whom extols the virtues of doing so. I am fully aware that a lot of seals are installed into a fully cut hole, with NO split, and those particular seals and holes, such as crank and other seals for G, F, vertically split cases, are different than these are.

I think if you were to split the cases, once again (yes, I know, a giant pain in the patoot), and install a new seal, dead dry, it'd work just fine, then, once back together, add the sealer around the outer seal and case faces.

A coating of 1194 around the OUTSIDE of the seal AFTER it is crimped in place when the cases are paired together, NOT A BAD DEAL AT ALL. Coating the outer face of the seal, almost guarantees the seal will eventually migrate out of its bore, even if it is installed in a crimped in place seal, seen it many times.

I know you installed the seal as the cases were apart, but it really should have been done dead dry, lacquer thinner or acetone cleaning both the seal bore faces and outer seal rubber, then dry, that is the way to go.

I really do expect to get hammered all over again over this, but it comes from over 40 years of doing this, and fixing this sort of stuff that myself in the beginning, and others have done before me. For me, I split the cases.

By the way, your work on this bike is stunning, I enjoy seeing the additions as you go along. WELL DONE, so far, sir.


Top
 Profile  
 
PostPosted: Mon Jan 18, 2016 10:44 pm 

Joined: Wed Jun 22, 2011 11:43 am
Posts: 311
Location: CT and Sometimes SC
I agree and have never used a sealant on this type of seal before. I took it on advice but will now be putting the new seal back in dry like I have done before. I don't know if The Hondabond helped it slip out or I just screwed up and bumped it while mating the cases. It is one of those things where I was concentrating so much on getting the middle shift fork aligned and just had a brain fart.


Top
 Profile  
 
PostPosted: Mon Jan 18, 2016 11:08 pm 

Joined: Thu Jun 09, 2011 11:25 am
Posts: 3156
The sealer is the problem, takesa long time to set up, and lets the seal migrate out of its bore. Did you notice how much easier the seal slipped the rest of the way out, vs a dry seal usually does? Until fully cured, all that stuff acts just like grease, slippery city. That is what I have always found, and one of the reasons I always split the cases on this type seal replacement jobs. I only like to do it ONCE!


Top
 Profile  
 
PostPosted: Sun Jan 24, 2016 7:24 am 

Joined: Wed Jun 22, 2011 11:43 am
Posts: 311
Location: CT and Sometimes SC
Had a little bit of a Now WTF did I do? moment this week.

I had thought the gauges were good to go once the cases dried and were a non issue, well not so. A few days after the pics of the meters were posted I found this,

Image

Image

They were fine when I left them. I contacted Marcel at CB750faces.com. He had never seen this happen before but we both think I must have over torqued the faces, and here is why. I used my new Vessel JIS screwdriver that looks like a monster alongside of the screwdriver I normally use for fine stuff like this.
Image

The Vessel tip fit perfect and I got a good grip on those screws, too good a grip I figure. But, like any good Politician or Weatherman I have an excuse;

I bought a 1972 Kawasaki H2 and the PO had done the gauges himself. The bike had about 150 miles before the 2 screws in both meters started to back out and the meters were farked. That was the bike I learned how to disassemble meters, try to fix them without asking questions, and then pay BOO COO Bucks for NOS Clocks. So, I figured now, tighten the Bejsus out of them and Loctite the screws. This has worked well for me when I used the Craftsman Driver, but The Vessel, it could clamp a Polka Dot into a Fly's Azz.

CB750faces.com Owner Marcel, being the excellent guy he is, offered to send me new faces no charge or would rebuild my clocks, and do it minus what I and already spent with him for the parts. I told him I would take the faces and that if I screwed it up again I would pay him in full to restore the meters. This is the kind of guy you want to do business with, Thank You Marcel.


Top
 Profile  
 
PostPosted: Sun Jan 24, 2016 7:29 am 

Joined: Wed Jun 22, 2011 11:43 am
Posts: 311
Location: CT and Sometimes SC
Other things happening too. The Head and Cylinders are back so they got painted. I should say they got Taped and then say they got painted cause these guys take a bit of taping and prep before paint. The plan is to bake them tomorrow morning 'cause the Wife is away till Tuesday.


Image


Oh, and the Countershaft Seal has been changed. I figure, if you ain't splittin cases twice or thrice you ain't bein thorough.

Image


Top
 Profile  
 
Display posts from previous:  Sort by  
Post new topic Reply to topic  [ 101 posts ]  Go to page Previous  1, 2, 3, 4, 5, 6, 7, 8 ... 11  Next

All times are UTC - 5 hours


Who is online

Users browsing this forum: No registered users


You cannot post new topics in this forum
You cannot reply to topics in this forum
You cannot edit your posts in this forum
You cannot delete your posts in this forum
You cannot post attachments in this forum

Jump to:  
Powered by phpBB® Forum Software © phpBB Group